Up until the beginning of 2020, I did all of my lifting at the gym. It was a great gym too: the owner was incredibly involved, and ran the type of place that gave free memberships to local high school and collegiate athletes (though far from D1), and had pictures from powerlifting meets and bodybuilding shows on the walls.
Like every other gym, though, they closed their doors during COVID after being ordered to by the state. Although they were closed for a relatively short period of time when compared to places like Canada or various European countries, the switch I made to working out at home was one that couldn't be reversed.
Even though I miss the atmosphere and the people, the ability to work out exactly when I want to without driving 45 minutes (it was that good of a gym) is something I can't get rid of.
The reason for writing this article is that, currently (beginning of 2022), this recent surge of the Omicron variant is yanking gym equipment off the "shelves" (although I realize most people buy things online nowadays) at almost the same rate things went away in early 2020.
I will detail the process of putting together a very capable home gym using homemade or minimal equipment.

I'm not particularly interested in calisthenics. I don't think that you can reach your full potential with a pullup bar and some parallettes, although that seems to be a popular sentiment these days. For one thing, your legs will suffer (which we will go into much detail below), and anybody who's anybody who's touched a barbell with a modicum of consistency throughout their life knows that training the largest muscle group in your body with heavy weight contributes just as much to your upper body as the amount of incline benching you do.
But consider the situation I've written this article to address: you've been locked out of your gym for the forseeable future. Or, alternatively, you're a scrawny 140 lb 19 year-old waiting tables who wants to make hay while the sun's still shining and build some muscle... but you don't have the extra scratch or inclination to swing by Planet or 24-Hour Fitness.
Maybe you're in a cramped apartment, or still living with your parents who's garage hasn't seen a car, work table, or anything that's not moldy boxes of bullshit in 20 years.
The pullup bar is the first item you need to acquire, and iconically the first "lift" anybody should be able to do a basic set of 10 on.
Even if you can do 20 pullups in a row, the easiest thing to do at home is pullups. A pullup bar takes up no space at all, especially if it is doorway-, ceiling-, or wall-mounted. If you buy nothing else, having a pullup bar in a doorway to knock out some sets in-between domestic activities will do more for your physique and upper body strength than all the stretchy band or spring-tension gizmos you are being aimed at with television ads.
Don't buy some stupid spring-steel contraption to go on your foot to clip your 40 lb. adjustable dumbbell to. Don't buy a flimsy adjustable bench that comes with a bunch of handled resistance bands to attach to it. Buy (or build) a pullup bar.
When I say pullup bar, those who have spent any time at all in the gym will know how non-specific that word is.
The first thing you will want to go to is a doorway-mounted bar. This can work, but if your thoughts are wandering to the type which wedges itself on top of your apartment's cheap MDF moulding, I would caution you a little bit here.
The pullup bar, in our case, is not just a thing to do pullups on. If you are anything like me in March of 2022, the pullup bar is the hearth. The keystone of your cathedral. Like the platform and the barbell are the center of any serious setup, the pullup bar is the heart of ours, because we are incapable of being "serious" at this point. Either you're too poor to afford 400+ pounds of plates and a decent barbell, or you simply cannot purchase one at this moment even if you had the money.
Do not take the sentence above about being "serious" too much to heart. If you stick with the setup I am describing for any period of time, you will undoubtedly exceed the wimpy 300lb weight limit of most "physics experiment" doorframe pullup bars. Is this from all those Waitr/Grubhub burrito orders while everything is shut down because of some new novel virus? No, it's because you will be doing weighted dips, pushups, and inverted rows on it. You will also probably want to be doing ring or suspended flyes, and if you use the "landlord friendly" Destroyer of Moulding, you will only be able to do these on one side of your doorway with some kind of margin of safety, and even then, it's not what the bar was designed for.
I'll make this simple for you, and list the options in order of preference based on things like "expandability" and height, which are all very important considerations if you have these kinds of options. Again, you may not be able to find some of these things, so we also delve a little into homemade options towards the middle-ish of the list.
Did you really expect to see this here?
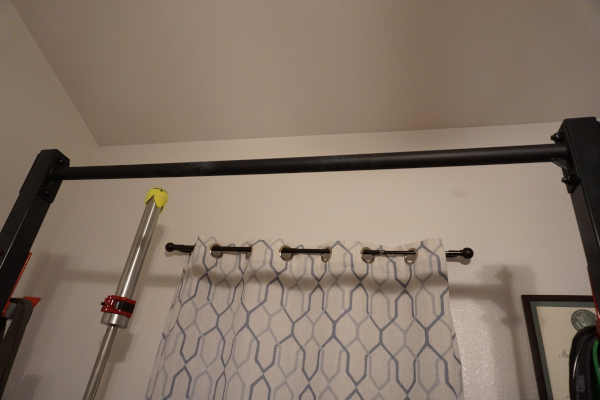
Isn't this whole thing about minimal equipment? It is. However, consider my situation: I started off with a doorframe pullup bar, and am now looking at a squat rack, barbell, and adjustable bench sitting in my living room. The point I'm trying to get at here is, if you have the means and it's available, a squat or power rack is a much better option, because you can use it for many, many more things. I use mine with the safeties for just about every barbell lift. I hook my homemade cable setup to it. I do pullups and suspended dips on it. I can do muscle ups on it. It's obviously the best choice if you want to expand your home gym when things become more available to you.
This is the next best option, and even something I'm looking at for my next place of residence, since you can mount the bar higher up in order to attach rings or pulleys. There also exist sets which have a separate pullup bar and dip bars/captain's chair which open up the much more stable bar dip instead of on rings or a suspension trainer. If you want to do weighted dips with any respectable amount of weight without risking utter shoulder girdle catastrophe, a set of fixed dip bars is important, but we will look at that in more detail.
If you've been to a park, you've seen these. A pair of 4x4's, a piece of galvanized steel pipe, some concrete, and hand tools is all you need. You can make this as high as you need, and also create attachment points for cables (explained more below). If you don't mind working out outdoors (and have a yard, which I don't), this is a good option.
These used to be a much more popular fixture in homes, especially with a cased-in opening without a door (think of the entry to a kitchen or mud room). It's a bar with two flanges that you screw into the framing around the opening using long lag screws/bolts. You can assemble one from a length of pipe and two threaded flanges, although you will need to carefully measure the length you need and get a length of steel pipe cut and threaded to the correct size.
Also on the market are telescopic ones which expand to fit the entryway and are screwed into place. Use the heaviest lag screw or bolt which will fit the holes in the flanges, and make sure to go as far into the framing around the doorway as possible (there will be a minimum of 3" of wood around most correctly framed openings).
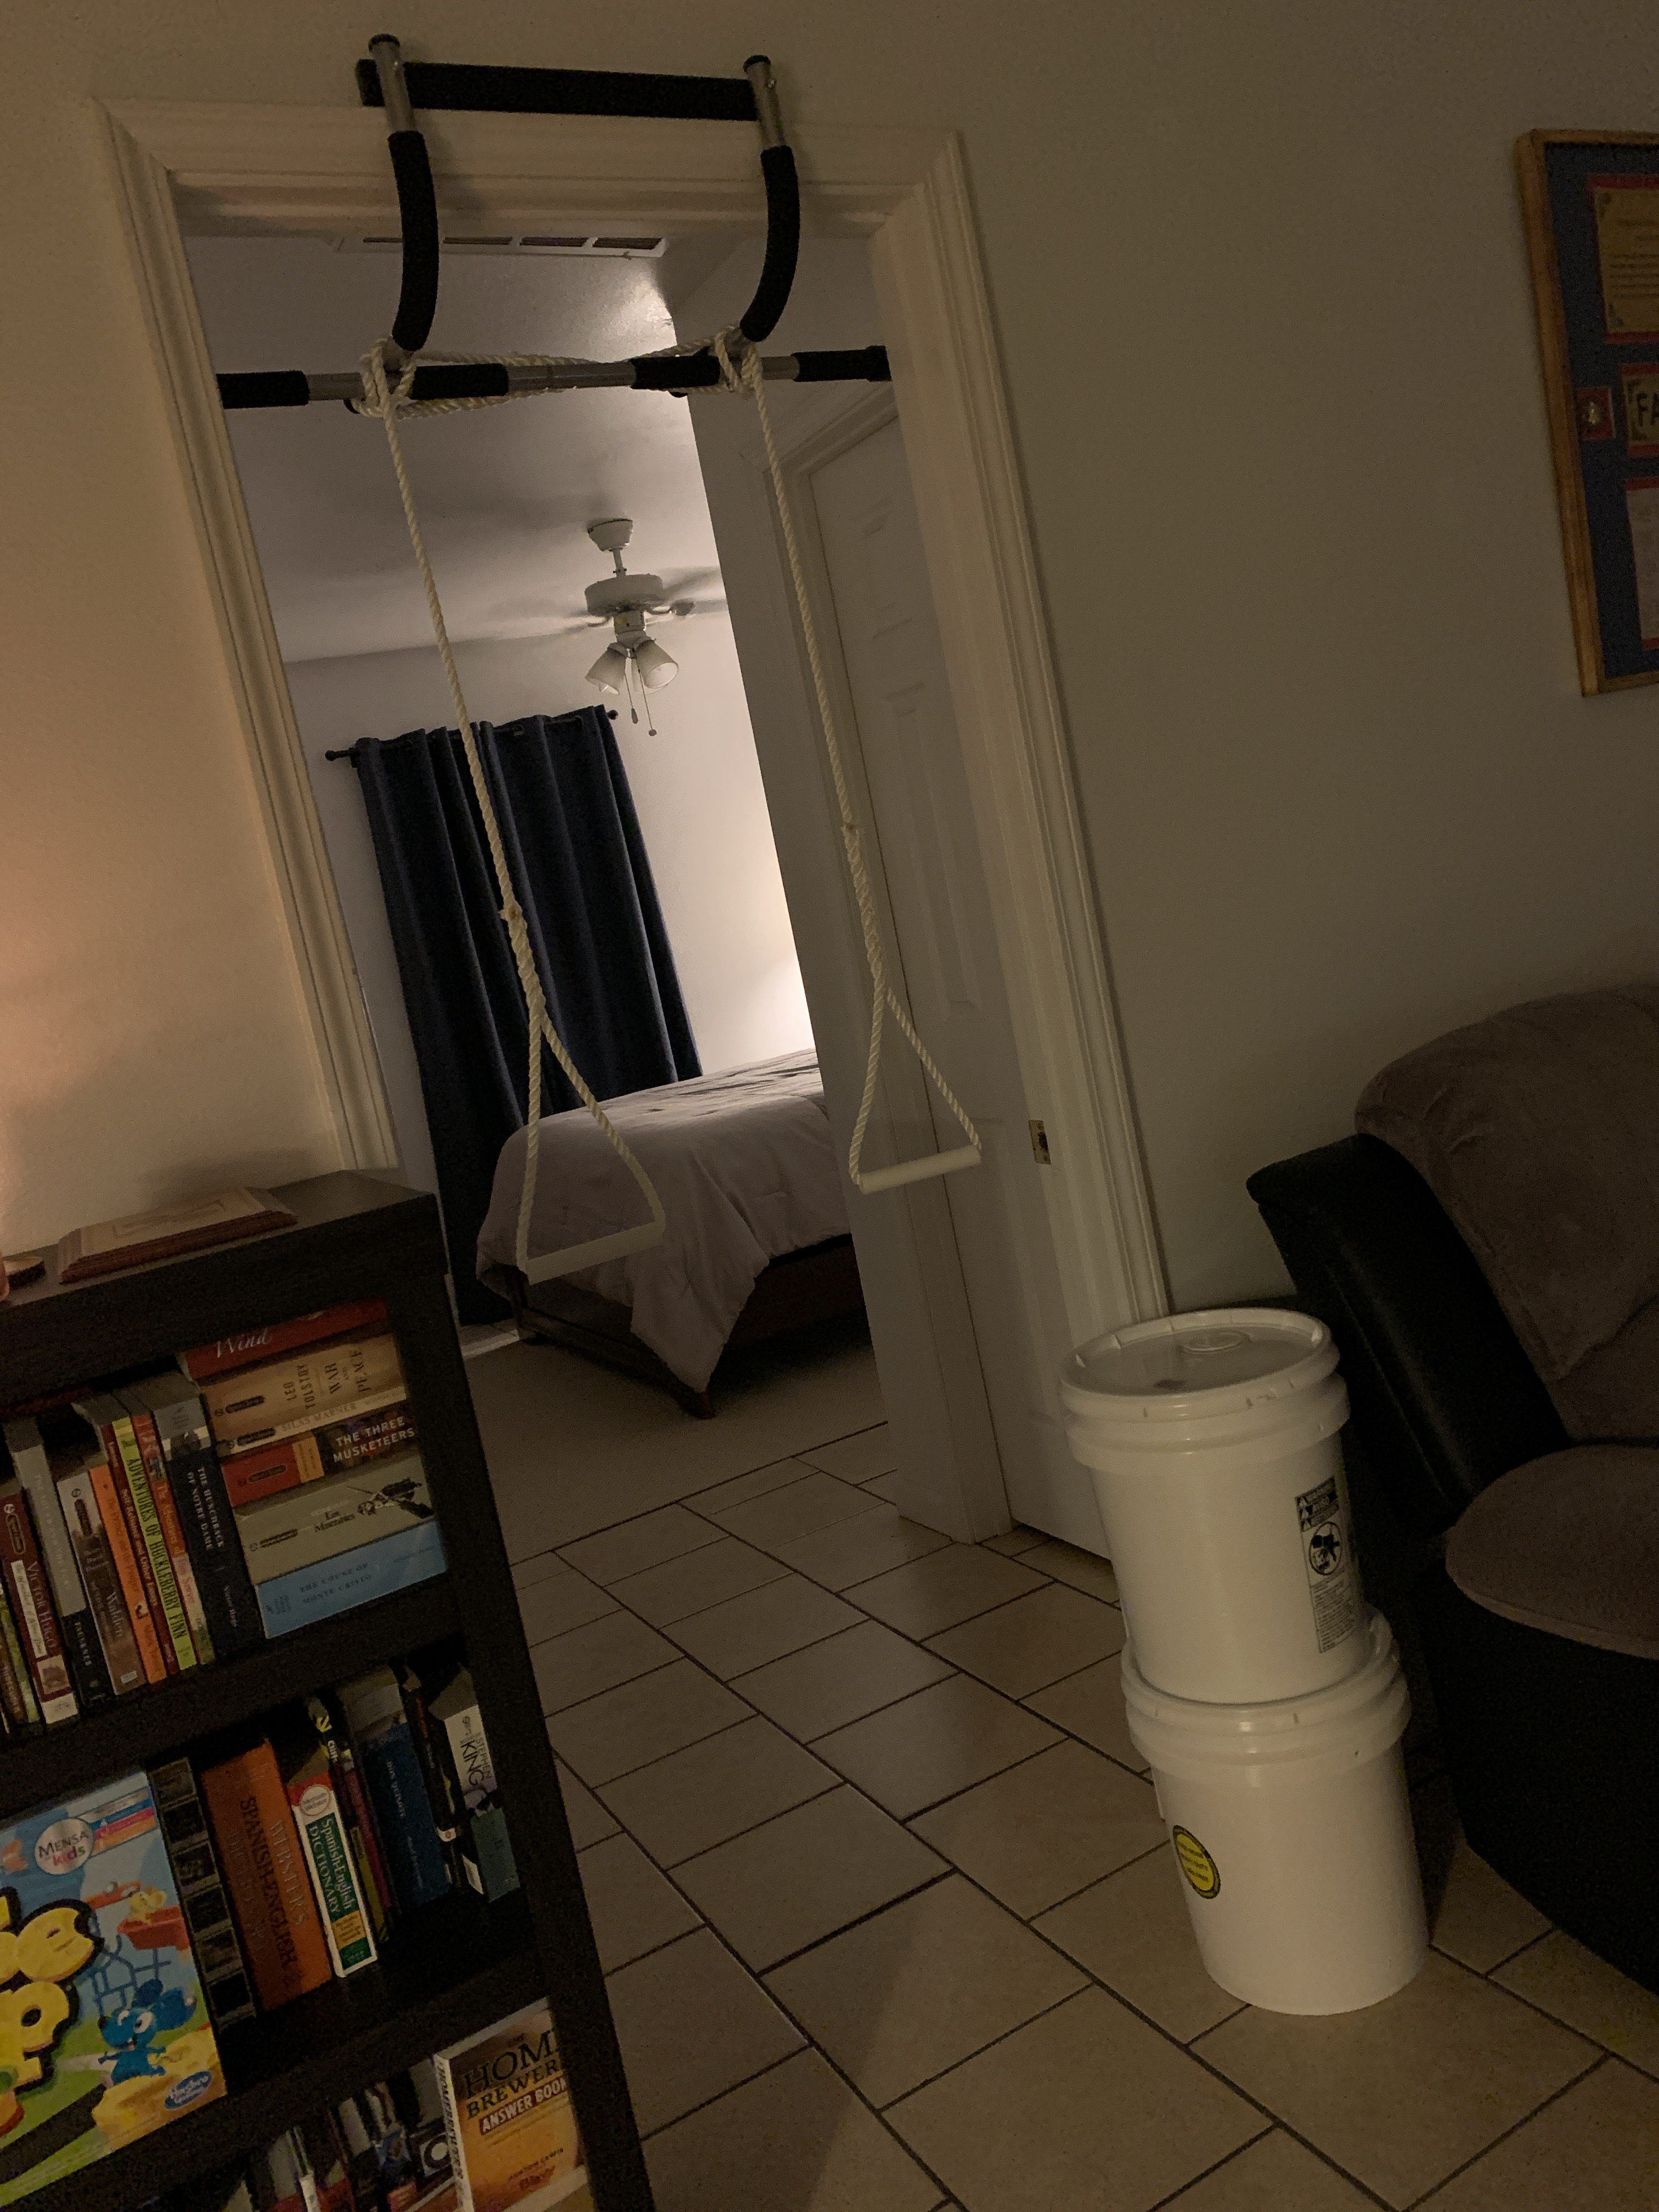
The absolute worst option, but sometimes all you can manage. These wedge themselves to the doorframe on top of the moulding. Make SURE you have solid wood moulding in good condition, as these have a tendency to make a divit in foam-core or MDF moulding. For suspended exercises, consider placing a makeshift or purchased crash-pad on the floor to prevent injury should the thing rip off of the moulding.
High rep calisthenics, or progression to more difficult variations, is usually enough to build muscle, at least for the upper body. Nobody's denying that.
However, if you're dumped in the situation outlined previously, you probably don't feel like working on a front lever. Or planches. Or assisted iron cross pullouts. You just want to build muscle using simple movements that can be learned in a matter of days instead of months.
The easiest way to do this is to take simple movements like pullups, chinups, dips, pushups, squats, etc., and add weight to them. Preferrably more weight week to week.
I especially like weighted pushups on a suspension trainer or parallettes (detailed further below), weighted dips, and weighted chinups.
How do you do this?
Quite possibly the simplest way to add weight, just not the most compact.
Adding weight can be done by adding it to a bookbag. Larger sandbags can be made from something like a seabag or duffel bag cinched tight with luggage straps.
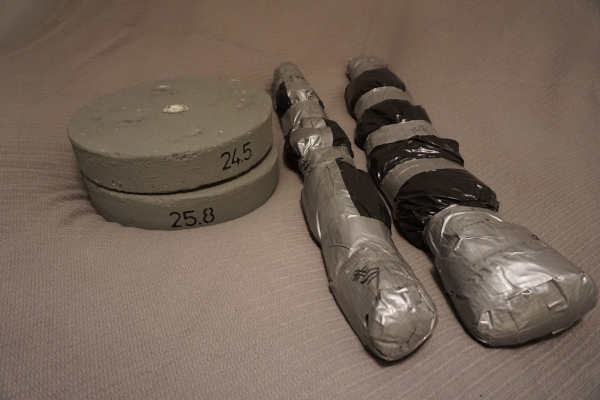
Sand, obviously, is messy. That's why we're going to roll it up into "cores", which are 20 lbs a piece, which you can load into bags to weight different exercises.
What we're doing here should be simple. Get a scale and a bucket, and measure out 20 lbs of play sand. Pour this into a contractor bag, and work the sand evenly to the bottom. Roll this into a tube, and duct tape it together. Start by capping off the ends, and then wrap a few times along the length of the "core".
Put these in a backpack, and you are now capable of doing weighted chinups, weighted pullups, and weighted pushups.
One thing you can also do is fill the bucket completely with sand, and install a tear-strip lid. The bucket of sand is useful for performing heavier lifts like good mornings and weighted split squats. It also is convenient for elevating your feet for things like decline pushups, and placing your back foot on for bulgarian split squats (using a sandbag for weight).
Making concrete weights is something most people have thought of at some point. Most cheap vinyl weights sold in stores are filled with a mixture of concrete and iron filings, after all.
About the only thing these are useful for is if you already have sandbags and you are able to get your hands on a barbell. You can then cast a piece of 2" or 1" PVC pipe in the center to go on the bar.
Another useful property is that concrete weights are inflexible. This can come in handy if you decide to make a cable setup (described further down), so the cables have no "mush" at the beginning of their range of motion while something like a sandbag gets lifted off of the floor.
Making a suspension trainer is the simplest thing you can do to open up more possibilities for upper body training.
Rings also work here. The only thing with rings is that when performing things like flyes (reverse or chest), they tend to twist more in the hands, and letting them slide both sticks at points and robs energy you could be putting, eventually, into the anchor, and moving your body through space.
Making a suspension trainer is very easy, although some thought needs to be put into the anchor, as described below.
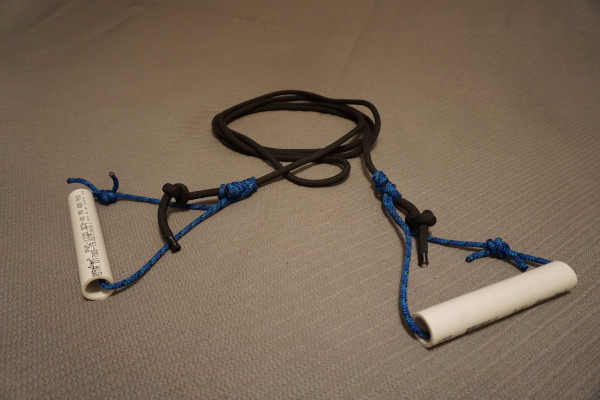
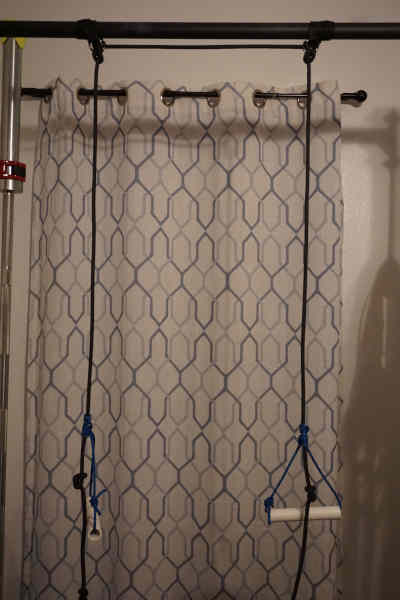
Anchoring is as simple as girth hitching the trainer over the pullup bar. This, however, doesn't lend itself very well for movements where you want the handles shoulder-width apart, like dips and pushups.
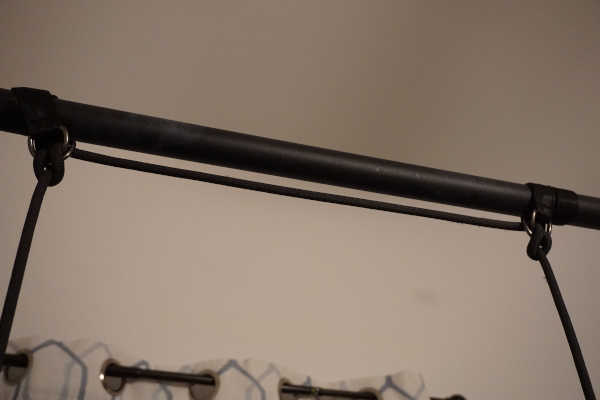
As a side note, you will get rope burns anyway. Just learn to love it.
Now, you can do things like "blast strap pushups", very popular (or at least they used to be when Westside for Skinny Bastards was the goto beginner program), inverted rows, and dips.
One quick usage note: if you plan to do suspended dips, work up to them slowly. Ideally, start by working up to a 30-second support hold ("rings" turned out), before working up to your first dip.
Adding weight (especially to dips) should be done slowly, and with full concentration. Getting too far off balance with weight added is a very fast way to tweak something in your shoulder (especially on dips), but no more than any other method of resistance training. Don't expect to match your weighted dip PR coming from fixed dip bars.
Speaking of which:
I list these together because they serve the same purpose. Doing dips and pushups on the suspension trainer is good because you have handles and you can switch from a pronated to supinated grip. Especially for pushups, this changes the muscles targeted significantly. Do a max set of reverse-grip "blast strap" pushups and tell me how your upper chest feels.
There are times when we want stability though. Doing dips, for example, we can use significantly more weight on fixed bars when compared to something like a suspension trainer or rings.
For weighted pushups, the stability can allow more weight in the backpack as well.
If you have two parallel surfaces, you already know you can do dips. You can also do more ergonomic dips by sticking the parallettes on top of them (making sure you taped the non-slip pads to the bottom when you get them though). This can save you from buying a set of dip bars.
If you can get to this point, a set of dumbbells can be useful.
It's likely you'll get a light set if you're following this guide for obvious reasons. Cheap adjustable dumbbells are sold by total weight if you buy a set. I managed to get a 55 lb set without breaking the bank.
These are perfectly fine for single-joint shoulder work, like lateral raises, Y-raises, and reverse flyes. For lateral raises though, you'll likely outgrow something like a 55 lb set fairly soon, at which point it's time to shift what weight you have to one dumbbell and start doing single-arm movements.
You were already thinking about them.
And for things like high-rep shoulder or arm movements (pull-aparts, lat "raises", overhead triceps extensions, etc.) they're pretty good.
The thing I found them more useful for, however, was improving the force curve of suspended movements.
The problem will become apparent when working on a suspension trainer. You'll either look up some movements, or try to invent them, and find there are few (if any single-joint) movements you can do completely parallel to the ground.
And this is the ideal angle to be. It means the force is constant throughout the entire movement (or at the very least changes minimally with the smaller change in body angle).
For everything else, you will have to change your body angle to be more upright, by moving your feet closer to the anchor (leaning less or more), until you can complete and entire rep with good form.
Except now you've probably noticed something else: the top of the rep is feather-light.
The solution I found was simple: girth hitch the band around the pullup bar, wrap it under your chest, and do your previously impossible feet-elevated chest flyes.
These are becoming more popular for home gyms, even "pretty" ones.
Spud inc. makes a high-low cable pulley which served as my inspiration, and it really is the simplest way to proceed.
I built mine when using concrete weights, so I made a loading pin from webbing and a stainless ring. You can make a similar loading pin for olympic plates if that's what you have.
If all you have are sandbags, you will have to make these a little differently. You will have to make the high cable short enough so that your sandbag does not touch the ground when attached. This also cuts down on your range of motion, but shouldn't matter for simple cable movements.
We've reached an interesting point in development here though. To do low cable movements, you need something to attach the low cable to.
When I got to this point, I had a squat rack, so I just attach the low cables to the feet of that.
This article will be updated to describe how to do this without a squat rack, since I also would like more flexibility in the position of the low cables on my setup. Right now, I can't do things like cable presses on my bench very easily since the bench also occupies the very space the weight and high cable does.
Suffice to say, the solution is a lifting platform made from plywood and horse stall matting with D-rings for the low pulleys to be attached to.
Having one high cable is preferrable, since you will likely only have one loading pin.
But having two low pulleys allows for things like two-armed lateral raises and cable crossovers.
So how do we accomplish this?
My first solution was to grab my climbing bag, hook a couple of snatch blocks to the feet of the rack, and run my suspension trainer through them, clipping the middle of the trainer to the high pulley, and adjusting the handles appropriately for what I was doing.
I'm sure you can see the problem here, though. As the middle of the rope is pulled tight towards the end of the range of motion, the pull gets very "spongy".

I'll just go ahead and describe where I was at this point.
I had a squat rack, some concrete weights, a couple of dumbbells, a pulley setup, resistance bands, and a suspension trainer (and rings).
Where did I go from here?
Well, suffice to say, after a few months of only bulgarian split squats, my legs were getting a little small. I needed a barbell.
Except I was too much in the DIY spirit to do that at first. Instead, I got a pair of adjustable plyo boxes, and did belt squats between them instead.
At this point, I also realized my concrete weights, still only 12" in diameter, were too wide to go between these boxes at anything resembling a natural squat stance easily.
So I thought about getting some plates to go on my dip belt.
Then I did what you should be doing: I bought a barbell and plates.
Congratulations! You made it!
Now that we've gotten through the "recommended sequence", I can list what I would do if I had to do this entire thing again. I've included this for reference. If you feel something here would work better for you, go ahead and try it. Just know: this is not what I did, just something I suspect would work better, guaranteed (no guarantees):
At this point, the next step is "completing" the setup with a set of squat stands (separate left/right with bench safeties), a barbell, and an adjustable bench.
At this point, I hope if you've been thinking about working out at home, but you don't have a lot of money or things are scarce, you now have at least some understanding of where to go.
This is by no means "the way". I am a firm believer in doing whatever the hell you want. As long as you get up and get moving, and do a good mixture of aerobic and resistance training, I will be very happy for you. Doing these two things will do more for your health and well-being than min-maxxing your setup or paying for crossfit classes twice a week.
So if you see something you want to do differently, things you want to add in at earlier points, or things you want to get rid of completely: do it! I'm listing all of this just to show you what I did, so somebody with no real clear direction can get started on a plan which will at least somewhat work because somebody's done it before. As always, feel free to go your own way. Fitness should be something you work on for the rest of your life, so if you try something that doesn't work out, you have plenty of time to find something that does.